top of page
Firefighting Robot
Summer 2020

Overview
During Summer 2020, I was selected to be a Berkeley Engineering Design Scholar. I worked in the Embodied Dexterity Group laboratory with Dr. Hannah Stuart on the construction of a robot for firefighting applications aiming to resist high temperatures when grabbing objects on fire. I researched and collected information about the different material properties at high temperatures and during fires. I simulated the chosen materials for heat transfer analysis using Ansys and applied microcontroller strategies to perform data acquisition during the experiments. Due to the current pandemic, I had to construct the experimental specimens at home and managed to safely perform experiments in a backyard, which demonstrated a 17% result error compared to the simulation. I considered this a reasonable number since working with fires requires making many assumptions, and my working conditions were not optimal compared to a well-equipped lab. Consequently, the experiments provided guidance for choosing the right combination of materials to constitute the base for a soft gripper in the future. This experience taught me how to keep working during unprecedented situations as well as how to work with topics that are a bit out of my comfort zone.
About the Firefighting Robot
Firefighters are usually at high risk and in dangerous missions. According to the National Fire Protection Association, research have shown data that firefighters are more likely to acquire chronic conditions, such as cancer and heart disease. Research also concluded that firefighters are prompted to 9% of increase in cancer detection compared to other citizens in the U.S. [3]. In addition, it has been shown that firefighters are at constant risk of exposure to hazardous gases in different scenarios such as structural and vehicle fires [1]. Firefighter are also at high risk of exposure to carbon monoxide, polycyclic aromatic hydrocarbons (PAHs), and other aromatic hydrocarbons. The body can absorb this kind of gases either inhaling or through the skin. A study showed that even when they are wearing a full protective wear, firefighters absorbed gases dermally [2].
We would like to create a mechanism to help firefighters on any of the following aspects:
-
Keep them safe in extra-high risk missions.
-
Reach out to places that humans cannot easily access.
-
Augment firefighter capabilities and automate tasks.
-
Detect danger using various sensors.
Research Plan of Action

Brainstorm
We were looking at the different scenarios that firefighters have to deal with such as the unstructured terrains in wildfires and burning buildings, how smoke obstructs vision, and the low oxygen levels. In addition, flames can ignite materials and create soot, char, and ash, which could affect contact conditions.
In order to start creating our firefighting gripper, we have started to look at the different materials and how they behave at high temperatures. This is the first step to find the right way to protect our robot.
Furthermore, I have taken the training for research with human subjects and we are currently waiting for the IRB (Institutional Review Board) approval to start interviewing firefighters. This step will make sure that we have chosen the right mechanism in order to safely help firefighters.
Data Collection
In this datasheet, it is possible to find the different properties for various materials such as wood, plastic, paper, gases, fuels, metals, and electrical equipment.
Material Selection
Insulation System:

We chose different materials that could create a system to resist up to 1200ºC. We want to maintain a desired internal temperature when the structure is exposed to fire.

Heat Transfer Analysis
Heat is transmitted through conduction, convection, and radiation. In the case of fire, radiation is the principal contributor of heat transfer to our 3-layer insulation system.

Heat transfer picture.
Source: shorturl.at/jkqIK
Simulations:
We have simulated our experimental set-up using ANSYS to run the thermal analysis and MATLAB to analyze the simulation results.
The tools allowed us to run the analysis for all three heat transmission scenarios simultaneously. In addition, it can be used in any geometry and it helps us to see temperature change in terms of time and position.
We have created 1D - Conduction + Radiation + Convection for our experimental set-up using the following layers configuration:
-
Ceramic Fiber + Cellulose Fiber + Kevlar
-
Ceramic Fiber + Cellulose Fiber + Polyurethane Foam
-
Ceramic Fiber + Rockwool + Kevlar
-
Ceramic Fiber + Rockwool + Polyurethane Foam
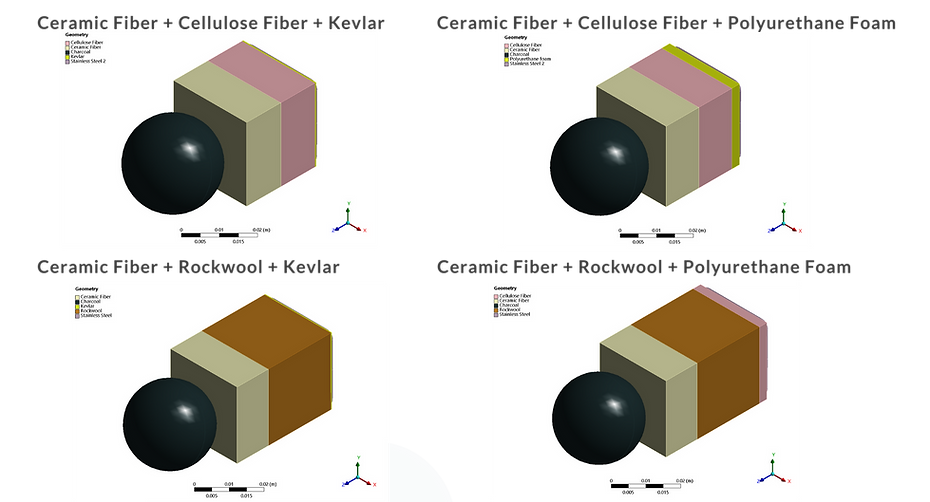
Simulation Set-up:
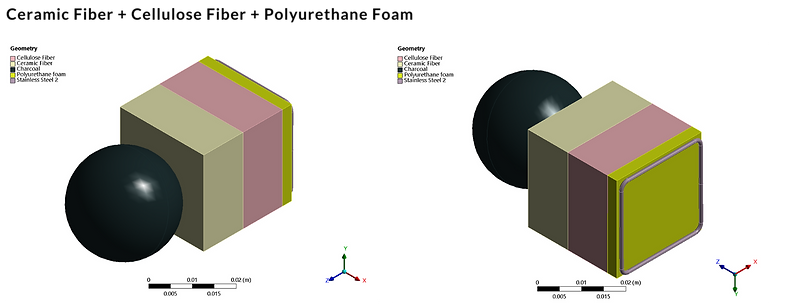
We have used common geometric figures to simulate our experimental set-up, which is going to consist on putting the layers around stainless steel tongs. Then the tongs are going to be touching a charcoal on fire for a certain period of time. Below is the completed analysis of a system constructed from ceramic fiber, cellulose fiber and polyurethane.
Thermal Analysis:
Ceramic Fiber + Cellulose Fiber + Polyurethane Foam
The following video shows the temperature distribution when the charcoal heats up to 1200ºC during 60 seconds. As observed, our insulation system does a great job on keeping the tongs at a desired temperature of 22ºC.

Bellow are the Ansys analysis for all possible combinations:
Results: Temperature vs Position
We are looking at the different temperatures at each boundary point. The graphs also show the maximum temperature of the different materials before they start melting (horizontal blue line). Bellow are the Matlab analysis for all possible combinations:


Results: Temperature vs Time for Each Layer Boundary


Thermal Analysis Results:
It was possible to conclude that:
-
The insulation systems using cellulose fiber as an insulation layer do not withstand the simulation for 60 seconds. It starts melting at 290ºC after about 44 seconds.
-
Mineral wool (rockwool) is going to allow the system to withstand fire at 1200ºC for more than 60 seconds before it starts melting. It is also possible to conclude that all four different combinations will maintain the tongs at room temperature and allow us to complete experiments for at least 30 seconds.
Experimental Set-up
The layers will be sewed together just as a ravioli. The ravioli will be used to make a glove that will be attached to the end of the tongs and then we will expose them to a charcoal on fire.

+
Ravioli
Source: Unsplash
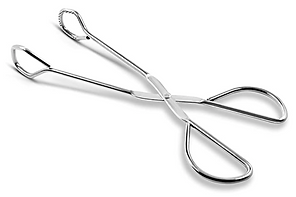
Tongs
Source: Amazon
+

Charcoal
Source: Unsplash
Thermocouple & Arduino:
A thermocouple type K will be attached to one end of the tongs to test our thermal analysis. The Arduino program reads the temperature from the thermocouple and saves it in an SD card. I have also added an LCD screen to read the temperature during the experiment.

Circuit Diagram

Final Circuit
Parts & Set-up:
Parts
-
1x Breadboard
-
8x Jumper wires
-
9x Female-to-male Dupont Wire
-
1x Arduino Uno
-
1x micro SD card
-
1x micro SD card adapter
-
1x MAX 6675 module
-
1x Type K thermocouple
-
1x LCD module display 16x2
Optional: I used an external power source
-
1x Male DC Plug to 9V Battery Clip Snap Accessories for Arduino
-
1x 9v Battery
Set-up:
LCD screen:
-
GND to ground
-
VCC to 5v
-
SDA to pin A4
-
SCL to pin A5
MAX6675 + Thermocouple: Screw the ends of the thermocouple to the MAX6675
-
GND to ground
-
VCC to 5v
-
SCK to pin 10
-
SO to pin 8
-
CS to pin 9
SD Card Adapter:
-
GND to ground
-
+5 to 5v
-
MISO to pin 12
-
SCK to pin 13
-
MOSI to pin11
-
CS to pin 4
Code:
Making the Specimens:
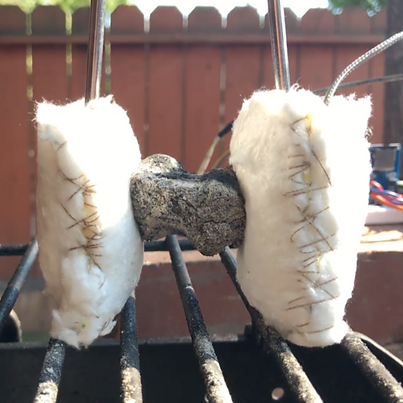
This is how I have made the ravioli. I first sewed the outside layers together and then I stuffed in the insulation materials. I also left a ½ inch of space to put the insulation inside. I made a total of 8 specimens (two for each side of the tongs). P.S. Gloves, mask, and safety goggles were used.
The ravioli looked like this:


Ravioli before sewing together to form the glove
Final Experiment Set-up:

Final Experiment Set-up
Testing
Testing Materials:
First, we took each material to see its reaction when exposed to fire. Here you can see all the materials tested.
The third video below shows how ceramic fiber responds to fire. As observed, it barely has a reaction


Materials before & after fire test:


Results from testing materials:
The combinations that included polyurethane foam on them were discarded because the foam was too brittle and its reaction to fire was not as expected. Only two of the combinations made of ceramic and kevlar as the outside layers were used.
Testing Selected Specimens:
Ceramic Fiber + Cellulose Fiber + Kevlar:
The following video presents the test for ceramic fiber, cellulose fiber, and kevlar. The specimen hold the charcoal for about 22 minutes and then we saw the different reactions through time.
Ceramic Fiber + Cellulose Fiber + Kevlar - Fire Test
Ceramic Fiber + Rockwool + Kevlar:
Now we performed the same experiment to ceramic fiber, Rockwool and kevlar. Nothing really excited happened to this system, WHICH IS GOOD!

Ceramic Fiber + Rockwool + Kevlar - Fire Test
Experiment Results:
As shown in the graph, the specimen that used Rockwool as an insulation layer showed a better performance, its internal temperature reached a maximum temperature of about 94°C at 21 minutes. The specimen with cellulose fiber as insulation showed really poor behavior since the internal temperature at the same time as the Rockwool test was around 340°C.
We attributed this behavior to the cellulose fiber because of its low decomposition temperature, we could also infer that the thermal conductivity may be increasing while the temperature is increasing as we saw during our research process.

Temperature vs Time from fire experiments
We also opened the raviolis after the experiments. As observe below, the combination using Rockwool also performed physically better than cellulose. This specimen was not affected whereas the specimen containing cellulose fiber started to affect the kevlar.

Ceramic Fiber + Cellulose Fiber + Kevlar

Ceramic Fiber + Rockwool + Kevlar
Charcoal Reading:
In the following video it is possible to observe the charcoal self ignited. When we pointed the IR laser to check the temperature in the black section it gives us a ready of about 500°C. However, when we pointed it to the grey section we get a reading of around 300°C.
We also found from different tests that we did with the grill that the maximum temperature that the charcoal could experience was around 500°C when it was touching the steel tube, and the maximum temperature without touching the tube was 250°C.
IR laser reading from charcoal
It was necessary to compare the simulations with the actual experiment. I have simulated one of the experiments as a 1D conduction-convection-radiation. Here Ceramic fiber + Rockwool + Kevlar is used to see how big is the error between the real experiment and the simulation and how much we can actually trust Ansys in the future.
Comparing results to simulation - Black section:
For this simulation, it was assumed that the charcoal temperature raises up to 500°C as seen in the black section using the IR laser. However, we could see a big discrepancy between our experimental results and the simulations. We have about 134% error at 16 minutes. In addition, the simulation only ran for a total time of 960 seconds, this time was ok since it is possible to see the difference between both results from an early stage.

Ceramic Fiber + Rockwool + Kevlar
For Ansys Simulation

Comparing results to simulation - Grey section:

Here, the same specimen is used but now the charcoal temperature was set to rise up to 250°C. It is observed how the simulation and actual experiments have an average error of about 17% at 16 minutes. We could also observe from the experiments that the pieces touching the ceramic fiber were mostly grey and only the top part were black.
Experiment Takeaways:
-
The charcoal and the IR laser showed us the difference between a black and grey body. This is also known as color temperature and it is related at how the temperature if related to the light radiated by the object.
-
The experimental results also leave with the question about how would ceramic fiber behave around fire and at really high temperatures.
-
Rockwool is the perfect insulator for our application: it is flexible, easy to work with, and it has low thermal conductivity.
-
The experiments helped to test the different materials. It was possible for was to feel the different textures and see the behaviors of the materials when they were exposed to fire. Finally, it was possible to conclude that ceramic fiber, Rockwool, and kevlar could be a good combination for a future soft gripper mechanism.
Personal Takeaways:
-
Learned how to do research and work with a team remotely.
-
Learned how to do thermal simulations in Ansys. This was my first time using Ansys, it was a fun challenge.
-
Learned how to have fun with failure. In order to find the right thermal analysis approach we went through a lot of trial and error.
Interviewing Firefighters
Good materials were found for the required application. Now, it is time to find the right mechanism by interviewing firefighters. I was able to take all the required training needed to get to interview firefighters; however, 10-weeks was not enough to complete this part of the project and it will be done by the lab as future work.
References
[1] Fent, K. W., & Evans, D. E. (2011). Assessing the risk to firefighters from chemical vapors and gases during vehicle fire suppression [Abstract]. Journal of Environmental Monitoring, 13(3), 536. doi:10.1039/c0em00591f
[2] Fent, K. W., Eisenberg, J., Snawder, J., & Sammons, D. (2014). Systemic Exposure to PAHs and Benzene in Firefighters Suppressing Controlled Structure Fires. The Annals of Occupational Hygiene. doi:10.1093/annhyg/meu036
[3] Firefighters and cancer. (n.d.). Retrieved August 13, 2020, from https://www.nfpa.org/News-and-Research/Resources/Emergency-Responders/Health-and-Wellness/Firefighters-and-cancer
Brainstorm
Data Collection
Heat Transfer Analysis
Materil Selection
Experiment Set-up
Test
Interviewing firefighters
References
Heading 5
bottom of page